Brett Sayles
And since then, O Kings and Ladies, I have been wandering to find him and my happiness is so great that it even weakens me like a wound…
Give Me Lut-erty or Give Me Death!

I hate presets. I have hundreds of presets. Don’t get me wrong, they’re handy, but I really only use them to get an idea of where I want to go with an image. If I apply one, I still have to spend a ton of time working through the settings to get the image right.
I’ve found that I really enjoy using LUTs/profiles much more. It’s probably more of a mental thing, but being able to apply a profile and yank one slider to adjust the effect is awesome. Once that’s done, all of the individual sliders are a blank slate. Oh the joy! I guess I’m saying that I can apply a color grade as a starting point, adjust its overall impact, then get to work on the image. For me, this is where it’s at.
What’s been driving me crazy for a while is not knowing how to create one. I figured out how to create a LUT .cube file, then find that Lightroom CC uses .xmp files…
Back to digging…
Then I found an article that pointed me toward this strange beast called the ACR and Lightroom Profile SDK. Oh the humanity! It even had a tutorial! I’m working through learning how to do this mysterious thing and decided to practice by taking some photos from my favorite Pexels Heros and creating profiles based on some of their photos. I’m not trying to copy or steal their edits, it just seems like a cool theme to use as I figure out the process. Hopefully they don’t get mad at me 🙂
Here, let me show you.

One of my favorite photographers is Ylanite Koppens. She’s a great photographer, but better yet, she’s a great human. Do yourself a favor and check out her profile on Pexels: https://www.pexels.com/@nietjuh
I love this photo. I think it’s the crushed, purple/blue shadows and the slight wash effect. Wouldn’t be cool to have a profile that did that? The answer is yes. So to start with, I needed to find a brown leaf on a grass background. I found this great shot by Steinar Engeland on Unsplash.

This isn’t a tutorial on the process, but if you want to learn, send me a message and I’ll get you a link to the SDK. I popped Steinar’s photo in Adobe Camera Raw and got to work on the photo using Ylanite’s color grading.

This part isn’t so easy, but after working on it for a while (and a bit of headache) I was fairly happy with the result. I exported the profile to an xmp file and imported it to Lightroom CC.
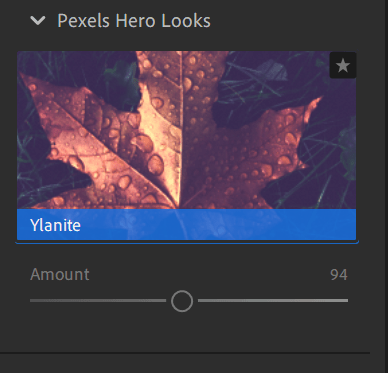
Now I can just click on Profiles, navigate to Ylanite and apply it! The amount can be adjusted with a single slider and serves as a starting point for further editing!
I don’t think I nailed the color grading, but I certainly learned a lot. Here are some before/after shots with Ylanite’s photo as a reference.


As you can see, I haven’t masted the art of profile making yet, but I’ll get there! I should have some pretty cool profiles to use when I’m done. I apologize in advance to my Pexels Hero friends if I don’t do justice to their edits… 🙂
